Introduction


 Overview
This is a mono repository for my home infrastructure and Kubernetes cluster. I try to adhere to Infrastructure as Code (IaC) and GitOps practices using tools like Ansible, Terraform, Kubernetes, Flux, Renovate, and GitHub Actions.
 Kubernetes
My Kubernetes cluster is deployed with Talos. This is a semi-hyper-converged cluster, workloads and block storage are sharing the same available resources on my nodes while I have a separate server with ZFS for NFS/SMB shares, bulk file storage and backups.
There is a template over at onedr0p/cluster-template if you want to try and follow along with some of the practices I use here.
Core Components
- actions-runner-controller: Self-hosted Github runners.
- cert-manager: Creates SSL certificates for services in my cluster.
- cilium: Internal Kubernetes container networking interface.
- cloudflared: Enables Cloudflare secure access to certain ingresses.
- external-dns: Automatically syncs ingress DNS records to a DNS provider.
- external-secrets: Managed Kubernetes secrets using 1Password Connect.
- ingress-nginx: Kubernetes ingress controller using NGINX as a reverse proxy and load balancer.
- rook: Distributed block storage for peristent storage.
- sops: Managed secrets for Kubernetes and Terraform which are commited to Git.
- spegel: Stateless cluster local OCI registry mirror.
- volsync: Backup and recovery of persistent volume claims.
GitOps
Flux watches the clusters in my kubernetes folder (see Directories below) and makes the changes to my clusters based on the state of my Git repository.
The way Flux works for me here is it will recursively search the kubernetes/apps folder until it finds the most top level kustomization.yaml per directory and then apply all the resources listed in it. That aforementioned kustomization.yaml will generally only have a namespace resource and one or many Flux kustomizations (ks.yaml). Under the control of those Flux kustomizations there will be a HelmRelease or other resources related to the application which will be applied.
Renovate watches my entire repository looking for dependency updates, when they are found a PR is automatically created. When some PRs are merged Flux applies the changes to my cluster.
Directories
This Git repository contains the following directories under Kubernetes.
📁 kubernetes
├── 📁 apps           # applications
├── 📁 bootstrap      # bootstrap procedures
├── 📁 components     # re-useable components
└── 📁 flux           # flux system configuration
Flux Workflow
This is a high-level look how Flux deploys my applications with dependencies. In most cases a HelmRelease will depend on other HelmRelease's, in other cases a Kustomization will depend on other Kustomization's, and in rare situations an app can depend on a HelmRelease and a Kustomization. The example below shows that atuin won't be deployed or upgrade until the rook-ceph-cluster Helm release is installed or in a healthy state.
graph TD
    A>Kustomization: rook-ceph] -->|Creates| B[HelmRelease: rook-ceph]
    A>Kustomization: rook-ceph] -->|Creates| C[HelmRelease: rook-ceph-cluster]
    C>HelmRelease: rook-ceph-cluster] -->|Depends on| B>HelmRelease: rook-ceph]
    D>Kustomization: atuin] -->|Creates| E(HelmRelease: atuin)
    E>HelmRelease: atuin] -->|Depends on| C>HelmRelease: rook-ceph-cluster]
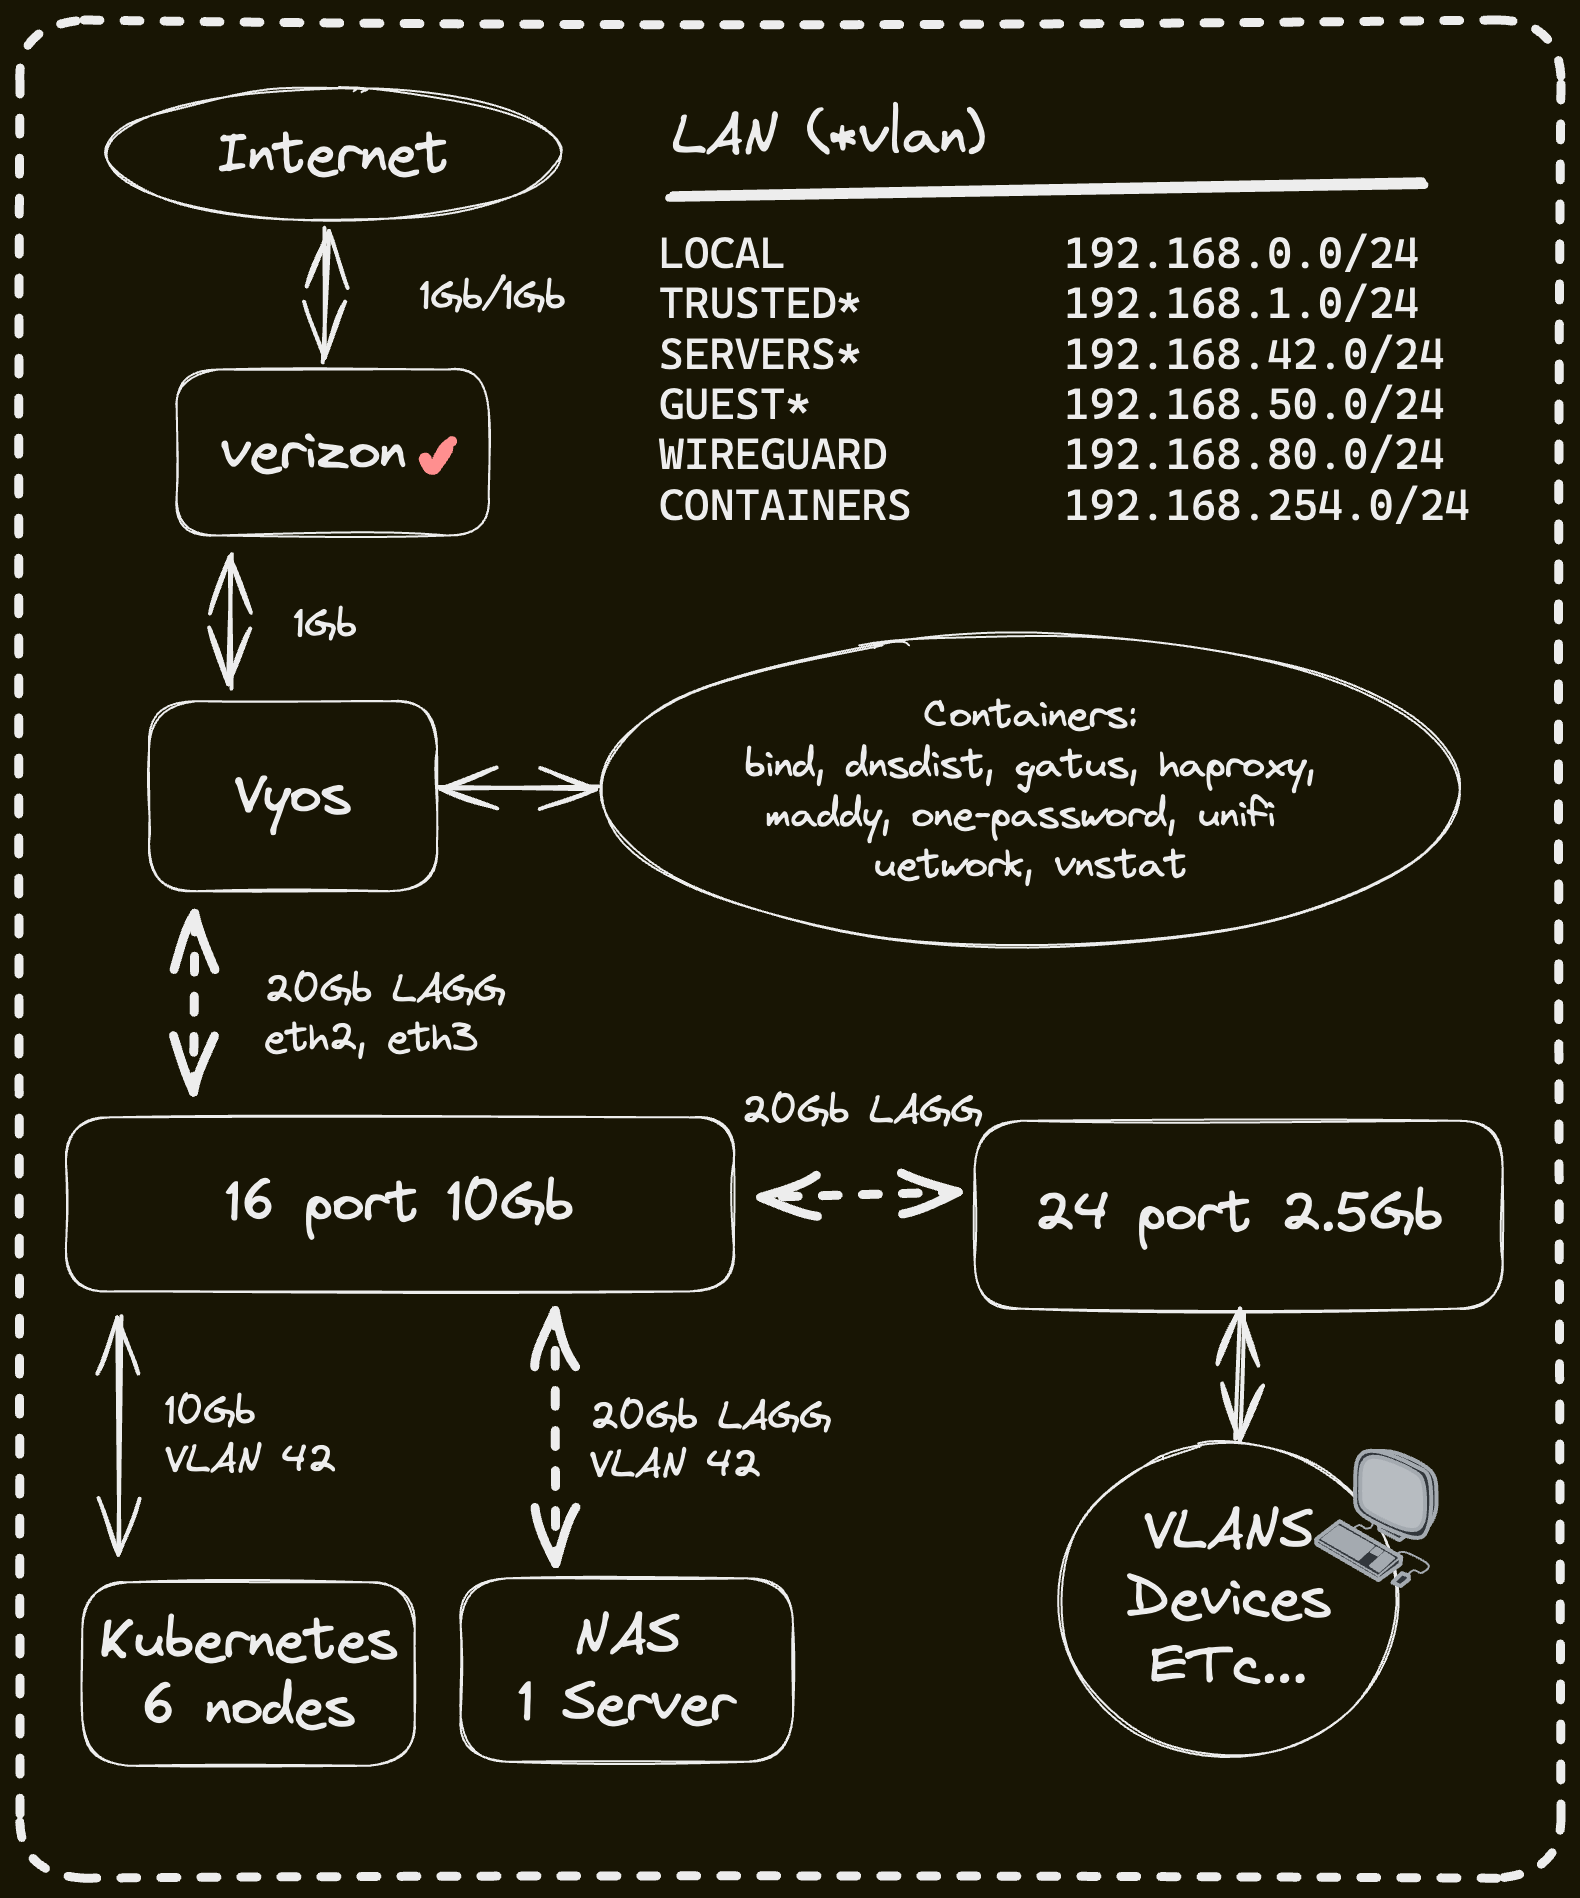
Networking
Click here to see my high-level network diagram
 Cloud Dependencies
While most of my infrastructure and workloads are self-hosted I do rely upon the cloud for certain key parts of my setup. This saves me from having to worry about three things. (1) Dealing with chicken/egg scenarios, (2) services I critically need whether my cluster is online or not and (3) The "hit by a bus factor" - what happens to critical apps (e.g. Email, Password Manager, Photos) that my family relies on when I no longer around.
Alternative solutions to the first two of these problems would be to host a Kubernetes cluster in the cloud and deploy applications like HCVault, Vaultwarden, ntfy, and Gatus; however, maintaining another cluster and monitoring another group of workloads would be more work and probably be more or equal out to the same costs as described below.
| Service | Use | Cost |
|---|---|---|
| 1Password | Secrets with External Secrets | ~$65/yr |
| Cloudflare | Domain and S3 | ~$30/yr |
| GCP | Voice interactions with Home Assistant over Google Assistant | Free |
| GitHub | Hosting this repository and continuous integration/deployments | Free |
| Migadu | Email hosting | ~$20/yr |
| Pushover | Kubernetes Alerts and application notifications | $5 OTP |
| UptimeRobot | Monitoring internet connectivity and external facing applications | ~$58/yr |
| Total: ~$20/mo |
 DNS
DNS
In my cluster there are two instances of ExternalDNS running. One for syncing private DNS records to my UDM Pro Max using ExternalDNS webhook provider for UniFi, while another instance syncs public DNS to Cloudflare. This setup is managed by creating ingresses with two specific classes: internal for private DNS and external for public DNS. The external-dns instances then syncs the DNS records to their respective platforms accordingly.
 Hardware
Click here to see my server rack
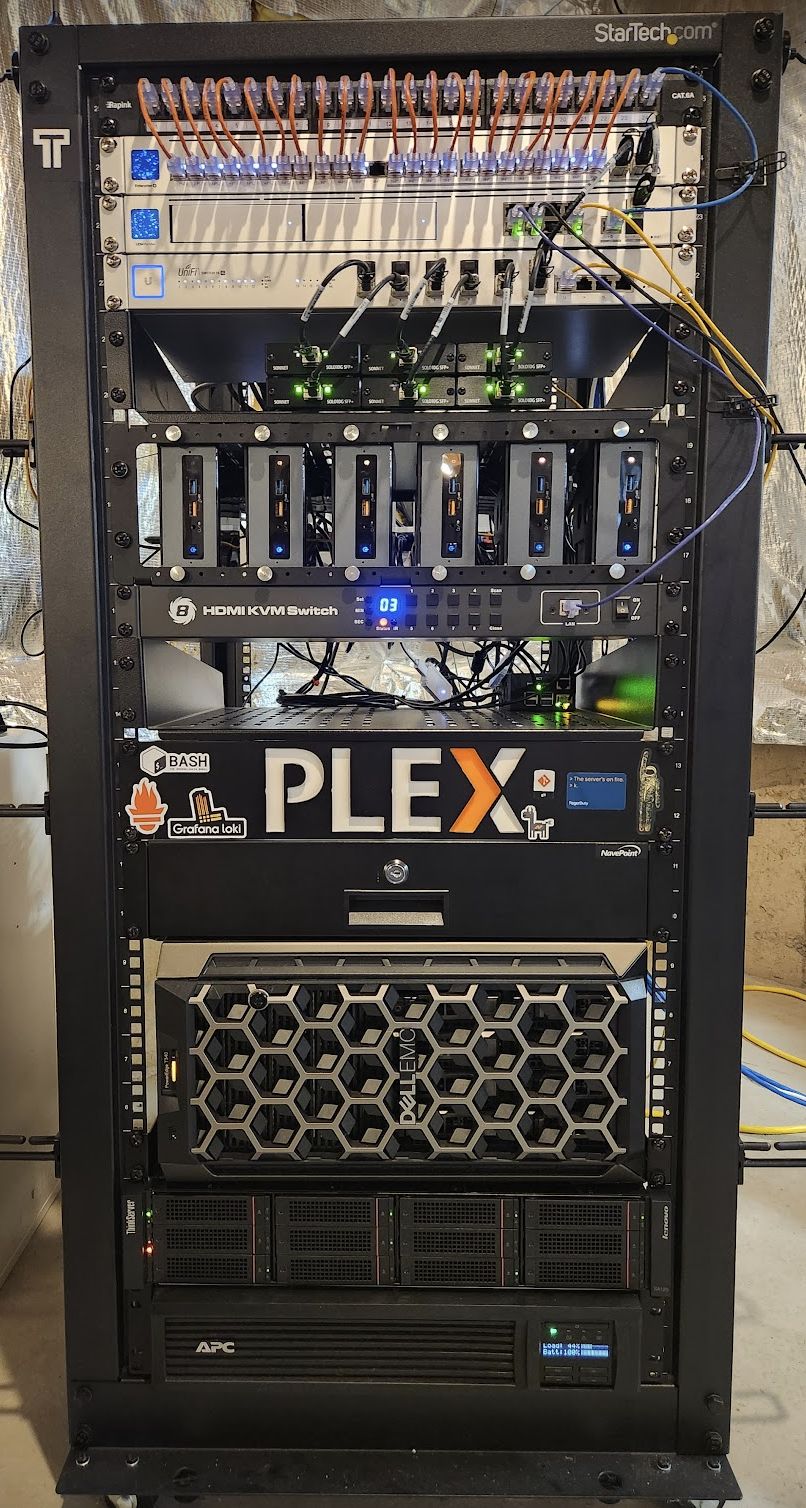
| Device | Num | OS Disk Size | Data Disk Size | Ram | OS | Function |
|---|---|---|---|---|---|---|
| ASUS NUC 14 Pro CU 5 125H | 3 | 1TB SSD | 1TB (local) / 800GB (rook-ceph) | 96GB | Talos | Kubernetes |
| PowerEdge T340 | 1 | 1TB SSD | 8x22TB ZFS (mirrored vdevs) | 64GB | TrueNAS SCALE | NFS + Backup Server |
| PiKVM (RasPi 4) | 1 | 64GB (SD) | - | 4GB | PiKVM | KVM |
| TESmart 8 Port KVM Switch | 1 | - | - | - | - | Network KVM (for PiKVM) |
| UniFi UDMP Max | 1 | - | 2x4TB HDD | - | - | Router & NVR |
| UniFi US-16-XG | 1 | - | - | - | - | 10Gb Core Switch |
| UniFi USW-Enterprise-24-PoE | 1 | - | - | - | - | 2.5Gb PoE Switch |
| UniFi USP PDU Pro | 1 | - | - | - | - | PDU |
| APC SMT1500RM2U | 1 | - | - | - | - | UPS |
 Stargazers
 Gratitude and Thanks
Thanks to all the people who donate their time to the Home Operations Discord community. Be sure to check out kubesearch.dev for ideas on how to deploy applications or get ideas on what you could deploy.
PiKVM
Load TESmart KVM
-
Add or replace the file
/etc/kvmd/override.yaml--- nginx: https: enabled: false kvmd: auth: enabled: false prometheus: auth: enabled: false atx: type: disabled streamer: desired_fps: default: 20 h264_bitrate: default: 2500 h264_gop: default: 30 quality: 75 gpio: drivers: tes: type: tesmart host: 192.168.1.10 port: 5000 wol_dev2: type: wol mac: 1c:69:7a:0d:8d:99 wol_dev3: type: wol mac: 1c:69:7a:0e:f7:ed wol_dev4: type: wol mac: 1c:69:7a:0d:62:d4 wol_dev5: type: wol mac: 94:c6:91:a7:7b:2b wol_dev6: type: wol mac: 94:c6:91:af:15:3d wol_dev7: type: wol mac: 1c:69:7a:09:bf:39 reboot: type: cmd cmd: ["/usr/bin/sudo", "reboot"] restart_service: type: cmd cmd: ["/usr/bin/sudo", "systemctl", "restart", "kvmd"] scheme: dev0_led: driver: tes pin: 0 mode: input dev0_btn: driver: tes pin: 0 mode: output switch: false dev1_led: driver: tes pin: 1 mode: input dev1_btn: driver: tes pin: 1 mode: output switch: false dev2_led: driver: tes pin: 2 mode: input dev2_btn: driver: tes pin: 2 mode: output switch: false dev2_wol: driver: wol_dev2 pin: 0 mode: output switch: false dev3_led: driver: tes pin: 3 mode: input dev3_btn: driver: tes pin: 3 mode: output switch: false dev3_wol: driver: wol_dev3 pin: 0 mode: output switch: false dev4_led: driver: tes pin: 4 mode: input dev4_btn: driver: tes pin: 4 mode: output switch: false dev4_wol: driver: wol_dev4 pin: 0 mode: output switch: false dev5_led: driver: tes pin: 5 mode: input dev5_btn: driver: tes pin: 5 mode: output switch: false dev5_wol: driver: wol_dev5 pin: 0 mode: output switch: false dev6_led: driver: tes pin: 6 mode: input dev6_btn: driver: tes pin: 6 mode: output switch: false dev6_wol: driver: wol_dev6 pin: 0 mode: output switch: false dev7_led: driver: tes pin: 7 mode: input dev7_btn: driver: tes pin: 7 mode: output switch: false dev7_wol: driver: wol_dev7 pin: 0 mode: output switch: false reboot_button: driver: reboot pin: 0 mode: output switch: false restart_service_button: driver: restart_service pin: 0 mode: output switch: false view: header: title: Devices table: - ["#pikvm", "pikvm_led|green", "restart_service_button|confirm|Service", "reboot_button|confirm|Reboot"] - ["#0", "dev0_led", "dev0_btn | KVM"] - ["#1", "dev1_led", "dev1_btn | KVM"] - ["#2", "dev2_led", "dev2_btn | KVM", "dev2_wol | WOL"] - ["#3", "dev3_led", "dev3_btn | KVM", "dev3_wol | WOL"] - ["#4", "dev4_led", "dev4_btn | KVM", "dev4_wol | WOL"] - ["#5", "dev5_led", "dev5_btn | KVM", "dev5_wol | WOL"] - ["#6", "dev6_led", "dev6_btn | KVM", "dev6_wol | WOL"] - ["#7", "dev7_led", "dev7_btn | KVM", "dev7_wol | WOL"] -
Restart kvmd
systemctl restart kvmd.service
Monitoring
Install node-exporter
pacman -S prometheus-node-exporter
systemctl enable --now prometheus-node-exporter
Install promtail
-
Install promtail
pacman -S promtail systemctl enable promtail -
Override the promtail systemd service
mkdir -p /etc/systemd/system/promtail.service.d/ cat >/etc/systemd/system/promtail.service.d/override.conf <<EOL [Service] Type=simple ExecStart= ExecStart=/usr/bin/promtail -config.file /etc/loki/promtail.yaml EOL -
Add or replace the file
/etc/loki/promtail.yamlserver: log_level: info disable: true client: url: "https://loki.devbu.io/loki/api/v1/push" positions: filename: /tmp/positions.yaml scrape_configs: - job_name: journal journal: path: /run/log/journal max_age: 12h labels: job: systemd-journal relabel_configs: - source_labels: ["__journal__systemd_unit"] target_label: unit - source_labels: ["__journal__hostname"] target_label: hostname -
Start promtail
systemctl daemon-reload
systemctl enable --now promtail.service
Secret variations with Flux
There are several different ways to utilize Kubernetes secrets when using Flux and SOPS, here’s a breakdown of some common methods.
I will not be covering how to integrate SOPS into Flux for that be sure to check out the Flux documentation on integrating SOPS
Example Secret
apiVersion: v1
kind: Secret
metadata:
  name: application-secret
  namespace: default
stringData:
  AWESOME_SECRET: "SUPER SECRET VALUE"
Method 1: envFrom
Use
envFromin a deployment or a Helm chart that supports the setting, this will pass all secret items from the secret into the containers environment.
envFrom:
  - secretRef:
      name: application-secret
View example Helm Release and corresponding Secret.
Method 2: env.valueFrom
Similar to the above but it's possible with
envto pick an item from a secret.
env:
  - name: WAY_COOLER_ENV_VARIABLE
    valueFrom:
      secretKeyRef:
        name: application-secret
        key: AWESOME_SECRET
View example Helm Release and corresponding Secret.
Method 3: spec.valuesFrom
The Flux HelmRelease option
valuesFromcan inject a secret item into the Helm values of aHelmRelease
- Does not work with merging array values
- Care needed with keys that contain dot notation in the name
valuesFrom:
  - targetPath: config."admin\.password"
    kind: Secret
    name: application-secret
    valuesKey: AWESOME_SECRET
View example Helm Release and corresponding Secret.
Method 4: Variable Substitution with Flux
Flux variable substitution can inject secrets into any YAML manifest. This requires the Flux Kustomization configured to enable variable substitution. Correctly configured this allows you to use
${GLOBAL_AWESOME_SECRET}in any YAML manifest.
apiVersion: v1
kind: Secret
metadata:
  name: cluster-secrets
  namespace: flux-system
stringData:
  GLOBAL_AWESOME_SECRET: "GLOBAL SUPER SECRET VALUE"
apiVersion: kustomize.toolkit.fluxcd.io/v1
kind: Kustomization
# ...
spec:
# ...
  decryption:
    provider: sops
    secretRef:
      name: sops-age
  postBuild:
    substituteFrom:
      - kind: Secret
        name: cluster-secrets
View example Fluxtomization, Helm Release, and corresponding Secret.
Final Thoughts
-
For the first three methods consider using a tool like stakater/reloader to restart the pod when the secret changes.
-
Using reloader on a pod using a secret provided by Flux Variable Substitution will lead to pods being restarted during any change to the secret while related to the pod or not.
-
The last method should be used when all other methods are not an option, or used when you have a “global” secret used by a bunch of YAML manifests.
YAML Madness
YAML aliases, anchors and overrides are a great way to keep your manifests DRY (Do not Repeat Yourself) but only on a very basic level.
Anchors and Aliases
The anchor operator & is a way to define a variable and the alias character * is a way to reference the value defined in the anchor.
apiVersion: v1
kind: PersistentVolumeClaim
metadata:
  name: &app "awesome-app"
  namespace: default
  labels:
    app.kubernetes.io/name: *app
this will be rendered out to...
apiVersion: v1
kind: PersistentVolumeClaim
metadata:
  name: awesome-app
  namespace: default
  labels:
    app.kubernetes.io/name: "awesome-app"
Overrides
apiVersion: monitoring.coreos.com/v1
kind: ServiceMonitor
metadata:
  name: &app "awesome-app"
  namespace: default
  labels: &labels
    app.kubernetes.io/instance: *app
    app.kubernetes.io/name: *app
spec:
  selector:
    matchLabels:
      <<: *labels
this will be rendered out to...
apiVersion: monitoring.coreos.com/v1
kind: ServiceMonitor
metadata:
  name: "awesome-app"
  namespace: default
  labels:
    app.kubernetes.io/instance: "awesome-app"
    app.kubernetes.io/name: "awesome-app"
spec:
  selector:
    matchLabels:
      app.kubernetes.io/instance: "awesome-app"
      app.kubernetes.io/name: "awesome-app"
Important Notes
- Defining an anchor, alias or override cannot be referenced in separate YAML docs whether it is in the same file or not.
- You absolutely cannot concat, or do any advanced string functions on anchors, aliases or overrides.
- Try to make sure your YAML is comprehensible, don't get hung up on making DRY an absolute rule to follow.
NAS
I am no longer use Ubuntu for my NAS therefore this document will likely not be updated anymore.
Packages
-
Add Fish PPA
sudo apt-add-repository ppa:fish-shell/release-3 -
Install Packages
sudo apt install -y apt-transport-https ca-certificates containernetworking-plugins curl ffmpeg figlet fish fzf gettext git htop ifenslave iputils-ping net-tools lolcat mailutils msmtp msmtp-mta nano neofetch ntpdate podman psmisc rclone software-properties-common tmux tree uidmap unzip zfs-zed zfsutils-linux dmraid gdisk hdparm lvm2 nfs-common nfs-kernel-server nvme-cli open-iscsi samba samba-vfs-modules smartmontools socat
Networking
-
Add or replace file
/etc/netplan/00-installer-config.yamlnetwork: version: 2 ethernets: enp6s0f0: dhcp4: yes mtu: 9000 enp6s0f1: dhcp4: yes mtu: 9000
ZFS
Mirrored Zpool
-
Create initial pool and set configuration
sudo zpool create -o ashift=12 -f eros mirror \ /dev/disk/by-id/scsi-SATA_WDC_WD120EDGZ-11_9LHWA5KG \ /dev/disk/by-id/scsi-SATA_WDC_WD120EMFZ-11_9MG0AHZA sudo zfs set atime=off eros sudo zfs set compression=lz4 eros -
Attach more mirrors
sudo zpool add eros mirror \ /dev/disk/by-id/scsi-SATA_ST12000VN0007-2G_ZCH0F1CH \ /dev/disk/by-id/scsi-SATA_WDC_WD120EMFZ-11_X1G3B01L -
Add spares
sudo zpool add -f eros spare \
    /dev/disk/by-id/scsi-SATA_WDC_WD120EMFZ-11_QGGETR5T
Datasets
-
Create datasets
sudo zfs create eros/Media sudo zfs create eros/Minio -
Share dataset over NFS
sudo zfs set \ sharenfs="no_subtree_check,all_squash,anonuid=568,anongid=100,rw=@192.168.42.0/24,rw=@192.168.1.0/24,ro=192.168.150.21,ro=192.168.150.28" \ eros/Media sudo zfs set \ sharenfs="no_subtree_check,all_squash,anonuid=568,anongid=100,rw=@192.168.42.0/24,rw=@192.168.1.0/24" \ eros/Minio -
Dataset Permissions
sudo chmod 770 /eros/Media
sudo chown -R devin:users /eros/Media
Snapshots
-
Install zrepl by following these instructions.
-
Add or replace the file
/etc/zrepl/zrepl.ymlglobal: logging: - type: syslog format: human level: warn monitoring: - type: prometheus listen: :9811 listen_freebind: true jobs: - name: daily type: snap filesystems: "eros<": true snapshotting: type: cron cron: "0 3 * * *" prefix: zrepl_daily_ timestamp_format: dense pruning: keep: - type: last_n count: 7 regex: "^zrepl_daily_.*$" -
Start and enable zrepl
sudo systemctl enable --now zrepl.service -
Give a local user access to a specific datasets snapshots
sudo zfs allow -u jeff send,snapshot,hold eros/Media
NFS
Force NFS 4 and update threads
-
Add or replace file
/etc/nfs.conf.d/local.conf[nfsd] vers2 = n vers3 = n threads = 16 [mountd] manage-gids = 1
Non ZFS NFS Shares
-
Add or replace file
/etc/exports.d/local.exports/share/PVCs 192.168.1.0/24(sec=sys,rw,no_subtree_check,all_squash,anonuid=568,anongid=100) /share/PVCs 192.168.42.0/24(sec=sys,rw,no_subtree_check,all_squash,anonuid=568,anongid=100) -
Dataset Permissions
sudo chmod 770 /share/PVCs sudo chown -R devin:users /share/PVCs -
Reload exports
sudo exportfs -arv
Time Machine
-
Install required tools
sudo apt install samba samba-vfs-modules -
Create ZFS datasets and update permissions
sudo zfs create eros/TimeMachine sudo zfs create eros/TimeMachine/devin sudo zfs create eros/TimeMachine/louie sudo chown -R devin:users /eros/TimeMachine sudo chmod -R 770 /eros/TimeMachine -
Set a smb password for user
sudo smbpasswd -a devin -
Add or replace file
/etc/samba/smb.conf[global] min protocol = SMB2 ea support = yes vfs objects = fruit streams_xattr fruit:aapl = yes fruit:metadata = stream fruit:model = MacSamba fruit:posix_rename = yes fruit:veto_appledouble = no fruit:nfs_aces = no fruit:wipe_intentionally_left_blank_rfork = yes fruit:delete_empty_adfiles = yes spotlight = no [devin] comment = Devin's Time Machine fruit:time machine = yes fruit:time machine max size = 1050G path = /eros/TimeMachine/devin browseable = yes write list = devin create mask = 0600 directory mask = 0700 case sensitive = true default case = lower preserve case = no short preserve case = no [louie] comment = Louie's Time Machine fruit:time machine = yes fruit:time machine max size = 1050G path = /eros/TimeMachine/louie browseable = yes write list = devin create mask = 0600 directory mask = 0700 case sensitive = true default case = lower preserve case = no short preserve case = no -
Restart samba
sudo systemctl restart smbd.service -
Set up Time Machine on MacOS
sudo tmutil setdestination -a smb://devin:${smbpasswd}@expanse.internal/devin
System
-
Disable apparmor
sudo systemctl stop apparmor sudo systemctl mask apparmor -
Disable mitigations and apparmor in grub
sudo nano /etc/default/grub # GRUB_CMDLINE_LINUX="apparmor=0 mitigations=off" sudo update-grub sudo reboot -
Disable swap
sudo swapoff -a
sudo sed -i '/ swap / s/^/#/' /etc/fstab
Notifications
-
Add or replace file
/etc/aliasesmailer-daemon: postmaster@ postmaster: root@ nobody: root@ hostmaster: root@ usenet: root@ news: root@ webmaster: root@ www: root@ ftp: root@ abuse: root@ noc: root@ security: root@ root: devin@buhl.casa
-
Add or replace file
/etc/msmtprcdefaults auth off tls off tls_trust_file /etc/ssl/certs/ca-certificates.crt logfile /var/log/msmtp account maddy host smtp-relay.turbo.ac port 25 from devin@buhl.casa tls_starttls off account default: maddy aliases /etc/aliases
-
Add or replace file
/etc/smartd.confDEVICESCAN -a -o on -S on -n standby,q -s (S/../.././02|L/../../6/03) -W 4,35,40 -m devin+alerts@buhl.casa
-
Add or replace file
/etc/zfs/zed.d/zed.rcZED_DEBUG_LOG="/var/log/zed.debug.log" ZED_EMAIL_ADDR="devin@buhl.casa" ZED_EMAIL_PROG="mail" ZED_EMAIL_OPTS="-s '@SUBJECT@' @ADDRESS@ -r devin+alerts@buhl.casa" ZED_NOTIFY_VERBOSE=1 ZED_NOTIFY_DATA=1 ZED_USE_ENCLOSURE_LEDS=1
Misc
Replace a Drive
sudo zpool offline eros /dev/disk/by-id/scsi-SATA_ST12000VN0007-2G_ZCH0F1CH
sudo zpool replace eros /dev/disk/by-id/scsi-SATA_ST12000VN0007-2G_ZCH0F1CH /dev/disk/by-id/scsi-SATA_ST22000NM001E-3H_ZX201HJC
When resilvering is complete detach the drive...
sudo zpool detach eros /dev/disk/by-id/scsi-SATA_ST12000VN0007-2G_ZCH0F1CH
Badblocks
This command is very destructive and should only be used to check for bad sectors, this also take ashile so be sure to start it in a screen
sudo badblocks -b 4096 -wsv /dev/disk/by-id/scsi-SATA_ST12000VN0007-2G_ZJV01MC5
Shred
This command is very destructive and should only be used to completely wipe the drive, this also take ashile so be sure to start it in a screen
sudo shred -vfz -n 4 /dev/disk/by-id/scsi-SATA_ST12000VN0007-2G_ZJV01MC5
Lenovo SA120
Due to the loudness of the fans, they can be adjusted by using AndrewX192/lenovo-sa120-fanspeed-utility.
Opnsense
I am no longer use Opnsense for my router therefore this document will likely not be updated anymore.
BGP
Instead of using Metallb for L2/L3 load balancer IPs I am using the Kubernetes Calico CNI with BGP which allows me to advertise load balancer IPs directly over BGP. This has some benefits like having equal cost multipath (ECMP) for scaled workloads in my cluster.
- Routing > BPG | General
enable=trueBGP AS Number=64512Network=192.168.42.0/24(Subnet your Kubernetes nodes are on)- Save
- Routing > BGP | Neighbors
- Add a neighbor for each Kubernetes node
Enabled=truePeer-IP=192.168.42.x(Kubernetes Node IP)Remote AS=64512Update-Source Interface=HOME_SERVER(VLAN of Kubernetes nodes)- Save
- Continue adding neighbors until all your nodes are present
- Add a neighbor for each Kubernetes node
- Routing > General
Enable=true- Save
- System > Settings > Tunables
- Add
net.route.multipathand set the value to1 - Save
- Add
- Reboot
- Verify
- Routing > Diagnostics | Summary
Without updating the configuration described in step 4 the routes from a client will only take a single path to your Kubernetes workloads even if they are scaled to more than one.
HAProxy
While kube-vip is very nice for having a API server ready to go and running in your cluster I had issues with mixing layer 2 and layer 3 between Calico in BGP and kube-vip using L2 ARP. You also cannot run Calico in BGP with kube-vip in BGP, they will fight and you will lose. Instead I choose to use Haproxy which you can install from the Opnsense Plugins.
- Services > HAProxy | Real Servers
- Add a server for each master node in your Kubernetes cluster
Enabled=trueName or Prefix=k8s-apiserver-xFQDN or IP=192.168.42.xPort=6443Verify SSL Certificate=false- Apply/Save
- Continue adding servers until all your master nodes are present
- Add a server for each master node in your Kubernetes cluster
- Services > HAProxy | Rules & Checks > Health Monitors
Name=k8s-apiserver-healthSSL preferences=Force SSL for health checksPort to check=6443HTTP method=GETRequest URI=/healthzHTTP version=HTTP/1.1- Apply/Save
- Services > HAProxy | Virtual Services > Backend Pools
Enabled=trueName=k8s-apiserver-beMode=TCP (Layer 4)Servers=k8s-apiserver-x... (Add one for each server you created. Use TAB key to complete typing each server)Source address=192.168.1.1(Your Opnsense IP address)Enable Health Checking=trueHealth Monitor=k8s-apiserver-health- Apply/Save
- Services > HAProxy | Virtual Services > Public Services
Enabled=trueName=k8s-apiserver-feListen Addresses=192.168.1.1:6443(Your Opnsense IP address. Use TAB key to complete typing a listen address)Type=TCPDefault Backend Pool=k8s-apiserver-be- Apply/Save
- Services > HAProxy | Settings > Service
Enable HAProxy=true- Apply/Save
- Services > HAProxy | Settings > Global Parameters
Verify SSL Server Certificates=disable-verify- Apply/Save
- Services > HAProxy | Settings > Default Parameters
Client Timeout=4hConnection Timeout=10sServer Timeout=4h- Apply/Save
Receive Side Scaling (RSS)
RSS is used to distribute packets over CPU cores using a hashing function – either with support in the hardware which offloads the hashing for you, or in software. Click here to learn more about it.
- System > Settings > Tunables
- Add
net.inet.rss.enabledand set the value to1 - Add
net.inet.rss.bitsand set to2 - Add
net.isr.dispatchand set tohybrid - Add
net.isr.bindthreadsand set to1 - Add
net.isr.maxthreadsand set to-1 - Save
- Add
- Reboot
- Verify with
sudo netstat -QConfiguration: Setting Current Limit Thread count 8 8 Default queue limit 256 10240 Dispatch policy hybrid n/a Threads bound to CPUs enabled n/a
Syslog
Firewall logs are being sent to Vector which is running in my Kubernetes cluster. Vector is then shipping the logs to Loki which is also running in my cluster.
- System > Settings > Logging / targets
- Add new logging target
Enabled=trueTransport=UDP(4)Applications=filter (filterlog)Hostname=192.168.69.111(Loki's Load Balancer IP)Port=5140rfc5424=true- Save
- Add new logging target
SMTP Relay
To ease the use of application configuration I have a SMTP Relay running on Opnsense using the Postfix plugin. From applications deployed in my Kubernetes cluster, to my nas, to my printer, all use the same configuration for SMTP without authentication.
- System > Services > Postfix > General
SMTP Client Security=encryptSmart Host=[smtp.fastmail.com]:465Enable SMTP Authentication=trueAuthentication Username=devin@<email-domain>Authentication Password=<app-password>Permit SASL Authenticated=false- Save
- System > Services > Postfix > Domains
- Add new domain
Domainname=<email-domain>Destination=[smtp.fastmail.com]:465- Save
- Apply
- Add new domain
- System > Services > Postfix > Senders
- Add new sender
Enabled=trueSender Address=admin@<email-domain>- Save
- Apply
- Add new sender
- Verify
swaks --server opnsense.turbo.ac --port 25 --to <email-address> --from <email-address>
Proxmox Considerations
I am using bare metal nodes but here's some considerations when using Kubernetes on Proxmox. These are just my opinions gathered from experience I've witnessed first or second hand. I will always advocate for bare metal Kubernetes due to the overhead of VMs and disk concerns, however following along below will net you a very stable Kubernetes cluster on PVE.
Preface: etcd needs 3 master/control plane nodes for quorum also it is really read/write intensive and requires low iops/latency. With using the same disk for all master nodes and due to the way etcd works anytime a commit happens to etcd (which is probably hundreds of times per second), it will flood the same filesystem with 3x the amount of reads and writes
Now if you layer on Longhorn or rook-ceph to the same filesystem you are just asking for trouble, because that is also replicated.
Single Node PVE Cluster
- Use physical separate disks used for the PVE install, k8s VMs and Longhorn/rook-ceph
- Don't put k8s VMs or Longhorn/rook-ceph on HDDs, only use SSDs or NVMe
- Use k3s with a single master node (4CPU/8GB RAM/50GB disk) that is using sqlite instead of etcd and taint it.
- Use as many worker nodes as you want but start with 3 and add more later on if you need them.
- Consider using local-path-provisioner over Longhorn or rook-ceph if you aren't able physically separate the disks.
Dual node PVE Cluster
Buy another node for your PVE cluster or refer to Single Node PVE Cluster, however if you must...
- Use k3s with a dual master nodes (2vCPU/8GB RAM/50GB disk each) that is using postgresql/mariadb/mysql (in that order) instead of etcd.
- Put the postgresql/mysql/mariadb database on a VM on your first PVE cluster. However, without some architecting this means that your cluster store is not highly available and is a single point of failure.
- Evenly spread out your k8s masters and workers across each PVE node
- In a 2 master/3 worker setup put one master on each PVE node and try to even out the workers on each PVE node.
- Consider using local-path-provisioner for application config data over Longhorn or rook-ceph if you aren't able physically separate the disks between Proxmox, VMs and Longhorn/rook-ceph.
Tripe node PVE Cluster
- Use physical separate disks used for the PVE install, k8s VMs and Longhorn
- Don't put k8s VMs or Longhorn on HDDs, only use SSDs or NVMe
- Evenly spread out your k8s masters and workers across each PVE node
- In a 3 master/3 worker setup put one master on each PVE node and one worker on each PVE node.
- Instead of Longhorn, consider setting up a Ceph cluster on your PVE nodes and use Rook to consume it for stateful applications. Due to the way Ceph works in this scenerio, it is fine to use HDDs over SSDs or NVMe here.
S3 buckets
Alternatively creating s3 buckets can be automated with Terraform.
b2
Creating a bucket
-
Create master
key-idandkeyon Account > App Keys -
Export settings
export B2_APPLICATION_KEY_ID="<key-id>" export B2_APPLICATION_KEY="<key>" export B2_BUCKET_NAME="<bucket-name>" -
Create the bucket
b2 create-bucket "${B2_BUCKET_NAME}" allPrivate \ --defaultServerSideEncryption "SSE-B2" \ --lifecycleRules '[{"daysFromHidingToDeleting": 1,"daysFromUploadingToHiding": null,"fileNamePrefix": ""}]' -
Create the bucket username and password
b2 create-key --bucket "${B2_BUCKET_NAME}" "${B2_BUCKET_NAME}" \
  listBuckets,readBuckets,listFiles,readFiles,writeFiles,readBucketEncryption,readBucketReplications,readBucketRetentions,readFileRetentions,writeFileRetentions,readFileLegalHolds
Minio
Creating a Bucket
-
Create the Minio CLI configuration file (
~/.mc/config.json)mc alias set minio "https://s3.<domain>.<tld>" "<access-key>" "<secret-key>" -
Export settings
export BUCKET_NAME="<bucket-name>" # also used for the bucket username export BUCKET_PASSWORD="$(openssl rand -hex 20)" echo $BUCKET_PASSWORD -
Create the bucket username and password
mc admin user add minio "${BUCKET_NAME}" "${BUCKET_PASSWORD}" -
Create the bucket
mc mb "minio/${BUCKET_NAME}" -
Create the user policy document
cat <<EOF > /tmp/user-policy.json { "Version": "2012-10-17", "Statement": [ { "Action": [ "s3:ListBucket", "s3:PutObject", "s3:GetObject", "s3:DeleteObject" ], "Effect": "Allow", "Resource": ["arn:aws:s3:::${BUCKET_NAME}/*", "arn:aws:s3:::${BUCKET_NAME}"], "Sid": "" } ] } EOF -
Apply the bucket policies
mc admin policy add minio "${BUCKET_NAME}-private" /tmp/user-policy.json -
Associate private policy with the user
mc admin policy set minio "${BUCKET_NAME}-private" "user=${BUCKET_NAME}"
Allow public access to certain objects in the bucket
This step is optional and not needed unless you want to make certain objects public to the internet
-
Create the bucket policy document and update the folders that should be public
cat <<EOF > /tmp/bucket-policy.json { "Version": "2012-10-17", "Statement": [ { "Effect": "Allow", "Principal": { "AWS": [ "*" ] }, "Action": [ "s3:GetBucketLocation" ], "Resource": [ "arn:aws:s3:::${BUCKET_NAME}" ] }, { "Effect": "Allow", "Principal": { "AWS": [ "*" ] }, "Action": [ "s3:ListBucket" ], "Resource": [ "arn:aws:s3:::${BUCKET_NAME}" ], "Condition": { "StringEquals": { "s3:prefix": [ "avatars", "public" ] } } }, { "Effect": "Allow", "Principal": { "AWS": [ "*" ] }, "Action": [ "s3:GetObject" ], "Resource": [ "arn:aws:s3:::${BUCKET_NAME}/avatars*", "arn:aws:s3:::${BUCKET_NAME}/public*" ] } ] } EOF -
Associate public policy with the bucket
mc anonymous set-json /tmp/bucket-policy.json "minio/${BUCKET_NAME}"
Sharing an object in a bucket
mc share download --expire=7d "minio/<bucket-name>/<file>.<ext>" --json | jq -r .share | pbcopy